We have had an on-going issue with our 25 gallon holding tank. Early on, I estimated how many flushes it would take to fill the tank. We have a Raritan head with a rotary valve that allows dry flushes (waste goes out but no incoming water) or wet flushes (waste goes out and fresh water comes in). Since the majority of waste that goes out can actually be fresh water instead of true waste, I estimated the number of wet flushes it would take to fill the holding tank (divided by some factor to account for the additional true waste).
The first time we tested the estimate, we went to pump out when we calculated that the tank would be one-quarter full. We timed how long it took to pump out our waste, then filled the tank with water through the pump-out deck filler until it was full. (We knew it was full when the sound of pouring water suddenly started to increase in pitch as the pump-out tubing filled.) We then timed how long it took to pump out the full tank. To our surprise, the full-tank pump-out took only about 50% longer than the first pump-out, meaning that the tank had been about two-thirds full instead of the expected one-quarter.
We adjusted our estimate and over the next couple of months we did many more pump-outs. Each time we measured how much water it took to completely fill the tank after it had been pumped out. To save time and potable water, we switched to pouring in river water two gallons at a time (minus an estimated 15% spillage). Eventually we got consistent results showing that the holding tank could take about 16 gallons of water after it had been pumped out, before it was completely full.
We read a lot about this, and a recurring theme is that the waste in a holding tank can, under certain circumstances, solidify into a concrete-like solid at the bottom of the tank. This would, of course, reduce the amount of waste that could be added before the tank would be full. We tried a number of different chemical and biological treatments, but nothing seemed to work. We were consistently able to add about 16 gallons of water after we had pumped out, before the tank would be full again. We would stay at the pump-out station for about an hour as we ran several tests after each of the chemical and biological treatments. (We always called approaching vessels to determine if they needed to pump out, and we would have cleared out for them and returned later.)
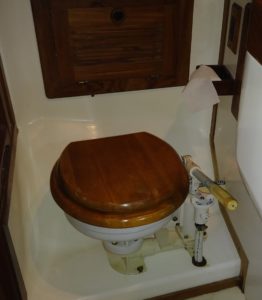
A previous owner of the boat had added an inlet to the tank in an accessible position at the top of the tank. (This was done in conjunction with removing the Y-valve to prevent direct discharge from the head to the sea.) There was also an inspection plate at the top of the tank, but it was heavily corroded. I didn’t want to open it because I believed that the cover (a non-standard size) would have to be replaced. We purchased a borescope so we could see what was going on through the new top-mounted inlet.
After a fresh pump-out, I removed the hose and looked into the tank to see a small bit of what was going on. I had a steel rod, and it would only go down about 6 inches, although the tank was about 15 inches high at its highest point. Aha, the dreaded concrete! I started banging the steel rod down to break up the concrete. Just under the surface of the concrete was a hard white substance. I banged and banged on it until a small piece of white chipped away. It was strange; why would it turn white? And the chipped-away piece was really white.
Regina mentioned at that point that I was not chipping away at the center of the tank. The tank is wider (port and starboard) at the top than at the bottom to conform to the underwater shape of the hull. I was chipping away at the slanted side, and the white substance and small chipped away piece was the fiberglass of the tank. (Obviously, Regina is the person that is more qualified to safely do any future head work.) At this point I stopped banging with the steel rod and just looked around more at the interior of the tank. I could see the level of the remaining liquid (mostly river water) was approximately the level of the top of the outlet where the pump-out tubing connected near the bottom of the tank. So at least I knew that we were truly pumped out.
At this point I did what I probably should have done at the start. I measured the tank vertically from the top of the discharge outlet at the bottom of the tank to the top of the vent outlet at the top of the tank. This distance was about 9 inches, so a considerable amount of the height of the tank lay above or below this range. Anything below the range could not get sucked out. Trying to add anything above the top of the vent would cause it to be forced up and out the vent, since there is no other vent on the top face of the tank. I separated the 9-inch vertical range into four sections and measured the width of the tank (port and starboard) for each of the ranges. Then I measured the length (fore and aft) of the tank and found it to be about 19 inches. Using 9 inches, 19 inches, and the width measurements from the four sections, I estimated the volume of the pumpable portion of the tank to be about 2.15 cubic feet. This, if my calculations are correct, is about 16.75 gallons. Given the roughness of the width measurements of the four sections, this matched surprisingly well the 16 gallons we had estimated when we were adding river water two gallons at a time.
So our 25 gallon holding tank may hold 25 gallons when it starts dry from the factory and is filled using a hose that also acts as its own vent, but it hold 16 gallons when it’s treated like a holding tank. Disappointing, but at least we know its true capacity and can plan for it. And we got a borescope (which we can certainly use later) out of the deal. We found out that Regina should be doing all of the head work from now on (you know, for safety’s sake.) Not bad for a few dozens of hours of work over a few months.